Administration
Changelog
eNMS changelog feature can be found under Home / Changelog.
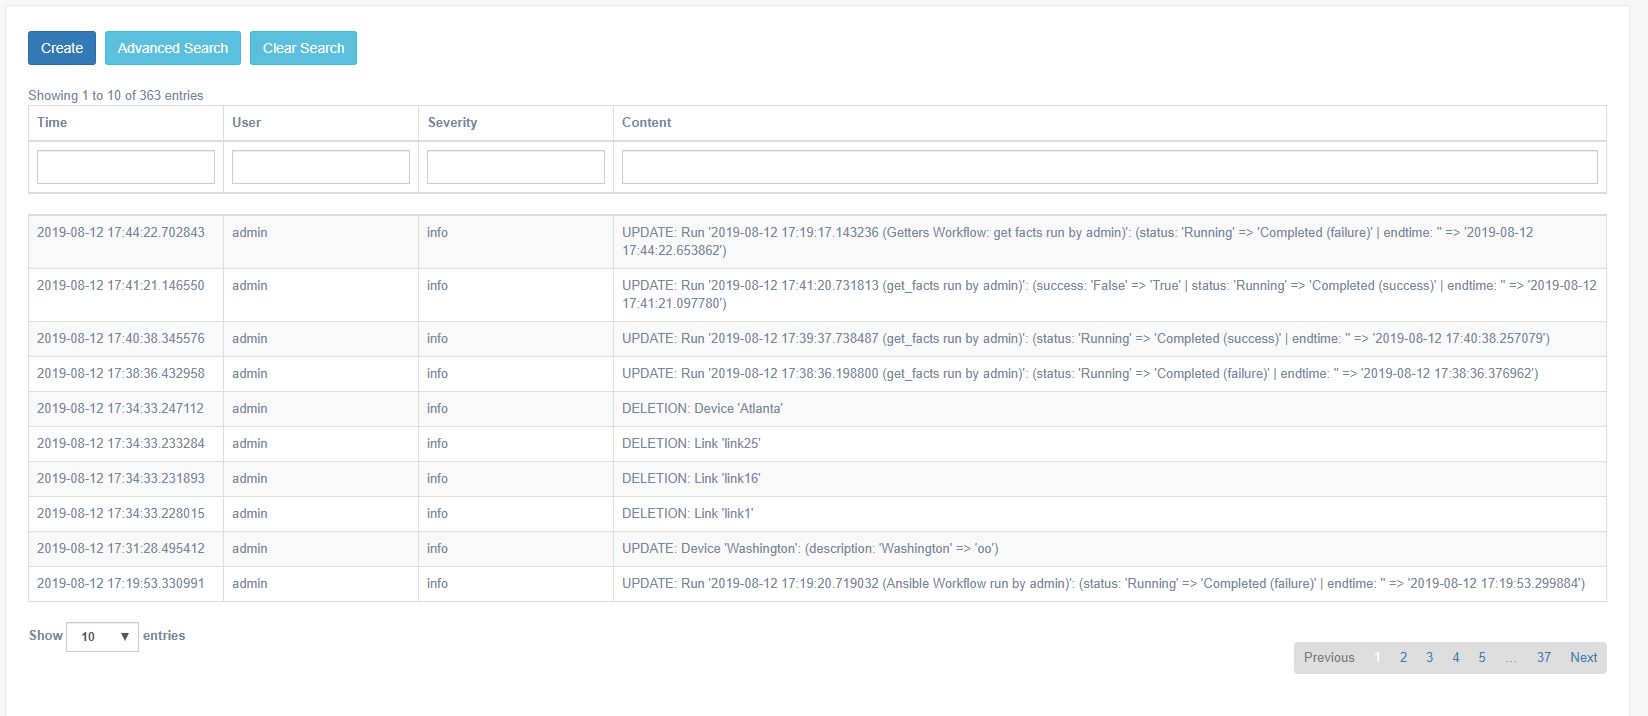
Changelog contains searchable information, search on:
- All types of creation and deletion related activity of objects supported by the application
- Modification activity, made to objects (e.g updates of values, naming etc.)
- Running of services / workflows; when they ran, who ran them
- Various administration logs, such as database migration, parameters update, etc.
- Custom logs, defined in services / workflows
Custom Properties
Properties of devices can be managed or extended with your own “custom” properties. Customized properties are read
from the properties.json file in the setup folder, with the following variables:
type(mandatory):string,integer,float, andbooleanpretty_name(optional): Custom name of the property in the UIdefault(optional): Default valueadd_to_dashboard(optional): Set totrue, to allow the property to appear in the dashboardprivate(optional): Iftrue, the value is considered sensitive: it will not be displayed in the UI. It will be encrypted in the database and stored in the Vault (if the Vault has been set up)is_address(optional): Set totrueif you want to property to be usable by GoTTY to connect to network devices (e.g hostnames, IP addresses, etc)
Note
Customized properties are defined ONCE, prior to eNMS starting up for the first time, since they are mapped into the database schema. Changes to customized properties require the database to be altered or dropped and reloaded to allow the object relational mapping to recreate the schema.
Credentials
All Credentials are stored in a Vault or in the database if a Vault has not been configured. For a production eNMS system, a Hashicorp Vault is recommended.
- User credentials can be used to authenticate to eNMS, as well as to authenticate to a network device
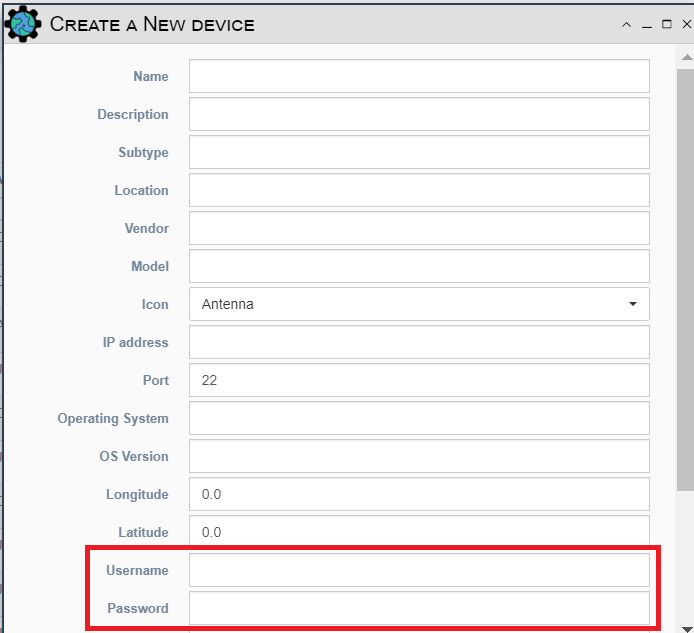
- Device credentials are properties of the device, consisting of
username,passwordandenable password, (required on some devices to enter the “enable” mode)
Database: Migration, Backup and Restore
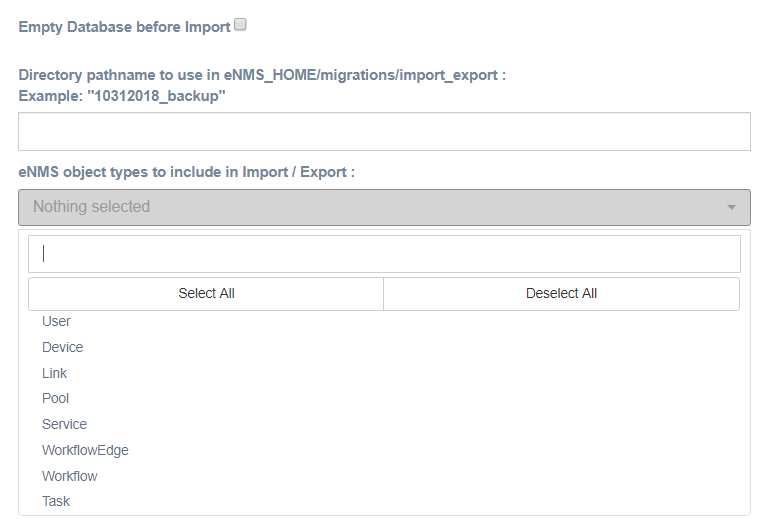
The eNMS migration system handles exporting the complete database content into YAML files.
By providing a directory name and selecting which eNMS object types to export/backup,
eNMS serializes the stored objects in the directory eNMS/files/migrations/directory_name.
These yaml files can then be copied into the same directory on a new VM instance of eNMS,
and then the Import function can be used to import/restore the configuration and living data of
those object types.
These migration files are used for migrating from one version of eNMS to the next version.
They are also used for Backup and Restore of eNMS.
The migration system is accessed from the Admin icon at the top of the UI or from the REST API.
Migration Import/ExportRestore/Import database on a newly created instance of eNMS:- Launch the GUI and login into a freshly built/installed eNMS system
- Ensure that the migration YAML files are present in the desired folder
- At the top of the UI screen, Click the Admin button
- Click
Migration Import/Exportand select options, all the object types from drop down menu and the directory of where the migration YAML files are kept and select Import - Alternatively, from the REST API, Select ‘Empty_database_before_import’ = True, specify the location of the directory to import from, select all object types to be imported: “user”, “device”, “link”, “pool”, “service”, “workflow_edge”, “task”
Migration Import/ExportBacking/Exporting database on an existing eNMS:- Launch the GUI and login into an existing eNMS system
- At the top of the UI screen, Click the Admin button
- Click
Migration Import/Exportand select all the object types from the drop down menu and select Export
Note
Exported backup files do not contain the secure credentials for each of the inventoried devices in plain text. The credentials are considered to be stored in a Vault in production mode.
Note
If you are migrating data onto an existing instance (as opposed to a fresh instance) of eNMS, you can select
the option Empty Database before Import to empty the database before starting the migration.
Note
See additional discussion of migration in the Installation Section
Per-type Mass Deletion: Select object type(s) to be deletedImport Service: Services and workflow can be exported and imported individually (as a .tgz archive); There may be a need to send a service / workflow from one VM to another. First, move the archive to the files/services folder, Click the Admin button, click on theImport servicesbutton and select the service from the drop down menuDelete Results/Logs: Will allow historical results, logs, and changelog to be deletedDelete Corrupted Edges: Scans workflows to find duplicate edges between services or reference to an edge between services where a service does not exist and then deletes them
Miscellaneous
Fetch Git Configurations: Will retrieve configurations from the git ‘configurations’ repository and load those into the database for each matching inventory device. This is performed automatically when eNMS starts up: the git configurations repository is quietly cloned and loaded into the database. This feature allows manual pulling of updated configurations dataScan Cluster Subnet: Will populate theAdmin -> Serverstable with related VMs where eNMS has been deployed as a cluster of Servers
Inventory
eNMS inventory, devices and links, can be exported and Imported into an Excel based format. When executing an exporting function, the file will be exported to a folder, local to the VM. When executing an importing function, the application will request for the desired file, local to the workstation/laptop. file,
Excel Import: Will import the excel file from your local workstation or laptopExcel Export: Will export the excel file onto your VM, in the directoryeNMS/files/spreadsheets
Local Server CLI interface
The local VM terminal can be used as a CLI interface, that interacts with the eNMS application. The prerequisite is to ensure that you are in the correct application directory and to deactivate any specific proxy settings. The proxy settings are company specified and will prevent commands from running. The user can now “ssh” into the VM and perform the following operations:
Run a service
If a service has been created on the application, the user can run a service via this CLI Interface.
- General syntax:
flask run_service <service_name> --devices <list_of_devices> --payload '{json dict}'- Options:
- –devices = List of comma separated device names (Optional) –payload = JSON dictionary of key/values, serving as starting data for the service to be used later (Optional)
Examples:
`flask run_service get_facts`
`flask run_service get_facts --devices Washington,Denver`
`flask run_service get_facts --payload '{"a": "b"}'`
`flask run_service get_facts --devices Washington,Denver --payload '{"a": "b"}'`
Delete old log entries
This command will purge logs changelog or result. By default, logs older than 15 days will be removed from their respective tables
- General syntax:
flask delete_log --keep-last-days <value> --log <value>- Options:
- –keep-last-days = Number of days to keep the logs (Optional: default to 15) –log = The log information to remove the logs from, either “changelog” or “result” (Required)
Examples:
`flask delete_log --keep-last-days 10 --log result`    // will retain the last 10 days of result
`flask delete_log --log changelog`                     // will retain the last 15 days of changelogs
Refresh Network Configuration Data
The Network Configuration data can be gathered and then stored in a central location, namely the git repository. eNMS
can be used to fetch the Network Configuration from git and have it stored locally in /network_data/
- General syntax:
flask pull_git- Options:
- None